

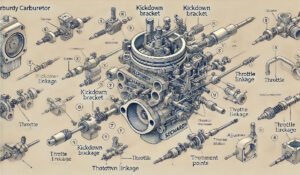
A kickdown bracket is an essential component in vehicles equipped with an automatic transmission, playing a pivotal role in optimizing vehicle performance. This bracket helps to manage the mechanics of gear shifting by connecting the carburetor’s throttle linkage to the transmission. Its primary function is to ensure that the vehicle can automatically shift down when the driver accelerates rapidly, thereby providing more power and a smoother ride.
Installing a kickdown bracket on a Sechardy carburetor is crucial for maintaining the integrity of your vehicle’s transmission, enhancing throttle response, and ensuring that shifts occur at the optimal time. The purpose of this article is to provide a comprehensive guide on installing a kick down bracket on a Sechardy carburetor, ensuring that even beginners can achieve professional results.
Essential Knowledge Before Starting
Before you embark on installing a kickdown bracket on a Sechardy carburetor, it’s crucial to grasp a few foundational concepts and prepare adequately with the right tools and materials. This preparation not only ensures a smoother installation process but also enhances safety and efficiency. Here’s what you need to know:
Understanding Key Components
1. Kickdown Bracket: This component is vital in vehicles with automatic transmissions. It facilitates the mechanical connection between the carburetor’s throttle mechanism and the transmission. Its primary role is to signal the transmission to downshift when the accelerator is significantly engaged, thus providing more power for acceleration.
2. Sechardy Carburetor: Known for its efficiency and performance, the Sechardy carburetor is a common choice among auto enthusiasts and professionals alike. Understanding its mechanics and how it integrates with your vehicle’s transmission system is crucial for any modifications, including installing a kickdown bracket.
3. Throttle Linkage: This system connects the accelerator pedal to the carburetor, controlling the air-fuel mixture that enters the engine. Proper connection and adjustment of the throttle linkage are crucial for optimal car performance, as it directly influences the engine’s response and efficiency.
Tools and Materials Needed
Having the right tools and materials at hand before starting the installation will save time and help avoid mid-process trips to the store. Here’s a checklist of what you’ll need:
- Kickdown Bracket Kit: Ensure it’s compatible with Sechardy carburetors. The kit should include all necessary hardware for installation.
- Screwdrivers: Both Phillips and flathead screwdrivers will be needed for various steps of the installation.
- Wrench Set: Adjustable wrenches or a set of fixed-size wrenches, typically including 10mm and 13mm, which are common sizes for car components.
- Needle-Nose Pliers: Useful for gripping small parts and manipulating the throttle and kickdown cables.
- Carburetor Cleaner: To clean the carburetor and surrounding area before installation, ensuring that no grime interferes with the new parts.
- Clean Cloth or Rag: For wiping off any dirt or residue after using the carburetor cleaner.
- Thread Locker: Optional but recommended to secure any screws and bolts firmly in place, preventing them from loosening due to vibration.
- Flashlight: To enhance visibility in dimly lit areas under the hood.
- Safety Glasses and Gloves: To protect against any accidental splashes of cleaner or debris.
Preparing the Workspace
- Workspace Setup: Ensure your workspace is clean, well-lit, and free of any unnecessary objects that could hinder movement or cause accidents.
- Vehicle Preparation: The vehicle should be parked on a level surface, preferably in a garage or a shaded area. Engage the parking brake and disconnect the battery to prevent any electrical shorts or unintended engine starts during the installation process.
Pre-Installation Steps
Proper preparation is crucial for a successful installation of a kickdown bracket on a Sechardy carburetor. Before diving into the actual installation process, it’s important to follow these pre-installation steps to ensure everything goes smoothly and safely. Here’s a detailed guide on preparing your vehicle and workspace for the task:
Vehicle Preparation
1. Secure the Vehicle:
- Parking: Ensure the vehicle is parked on a level surface to prevent any movement during the installation process. This not only makes working on the vehicle safer but also ensures accuracy in fitting and adjustments.
- Engage the Parking Brake: This is a critical safety step to prevent the vehicle from rolling.
- Disconnect the Battery: Open the hood and disconnect the negative battery cable to eliminate any risk of electrical shorts or accidental engine starts while working. This is a standard safety procedure when performing any work involving the vehicle’s electrical or mechanical components.
Safety Measures
2. Personal Protective Equipment (PPE):
- Safety Glasses: Always wear safety glasses to protect your eyes from harmful sprays, spills, or debris that might occur while cleaning or installing the bracket.
- Gloves: Wear a pair of mechanic gloves to protect your hands from sharp edges, grease, and chemicals like carburetor cleaner.
- Proper Clothing: Ensure to wear closed-toe shoes and avoid loose clothing that could get caught in moving parts if the engine is started.
Workspace Setup
3. Organize Your Tools and Materials:
- Gather all the necessary tools and materials listed in the previous section and lay them out in your workspace. Having everything within reach helps streamline the installation process and reduces the likelihood of errors.
- Lighting: Make sure your workspace is well-lit. Good lighting is crucial for seeing what you’re doing, especially in the more cramped, shadowy areas of the engine bay.
Carburetor and Engine Bay Preparation
4. Clean the Work Area:
- Use a carburetor cleaner and a clean cloth to wipe down the carburetor and surrounding areas. Removing dirt, oil, and grime from the carburetor ensures that the new bracket will fit securely and operate cleanly.
- Inspection: Check for any signs of wear or damage on the existing throttle linkage and surrounding components. This is a good time to replace any worn parts before installing the new kickdown bracket.
5. Familiarize Yourself with the Carburetor Layout:
- Take a moment to identify and familiarize yourself with the throttle linkage, existing kickdown mechanism (if applicable), and other nearby components. This will aid in the smooth removal of old parts and the correct installation of the new bracket.
- Documentation: If available, refer to your vehicle’s service manual for detailed diagrams and specifications related to the carburetor and transmission linkage. This can provide valuable insights and cautions specific to your model.
Installation Guide
Installing a kickdown bracket on a Sechardy carburetor involves a series of steps that require attention to detail and careful handling to ensure optimal performance and safety. Here’s a detailed step-by-step guide to help you through the process:
Step 1: Accessing the Carburetor
Removing Obstructions:
- Air Cleaner Assembly Removal: Begin by removing the air cleaner assembly to clear the way to the carburetor. This typically involves loosening a few clamps or screws. Use your screwdrivers or a wrench, depending on the assembly’s fastening method.
- Visual Inspection: With the air cleaner removed, inspect the area for any disconnected hoses or loose connections that may need attention before proceeding.
Step 2: Removing the Old Kickdown Bracket (if applicable)
Dismantling Existing Setup:
- Identify and Unfasten: Locate any existing kickdown bracket if previously installed. Use the appropriate screwdrivers or wrenches to carefully remove the bracket, noting the orientation and attachment points for reference when installing the new bracket.
- Keep Parts Organized: Keep all screws, bolts, and washers in a tray or magnetic parts bowl to prevent loss. Compare them with the new parts for size and fit, as some may need to be reused.
Step 3: Installing the New Kickdown Bracket
Mounting the Bracket:
- Position the New Bracket: Align the new kickdown bracket with the designated mounting points on the Sechardy carburetor. Make sure the bracket sits flush against the carburetor without forcing it into position.
- Secure the Bracket: Use the provided hardware from the kit to secure the bracket. Start all screws by hand to ensure proper threading, then tighten them evenly with a wrench or socket set to avoid warping or undue stress on the carburetor.
Step 4: Connecting the Throttle and Kickdown Cables

Linkage and Cable Setup:
- Throttle Linkage Connection: Attach the throttle linkage to the new bracket’s connection point. This might require slight adjustments to the length or angle of the linkage to ensure smooth operation.
- Kickdown Cable Attachment: Connect the kickdown cable from the transmission to the bracket. The correct tension is crucial; it should be tight enough to actuate but not so tight that it binds or impedes the movement of the throttle linkage.
- Adjustment: Use the adjustment features on the kickdown cable to fine-tune the cable tension. Follow the manufacturer’s guidelines or your vehicle’s service manual for specific settings.
Step 5: Adjusting and Testing
Final Adjustments and Checks:
- Manual Operation Check: Before reconnecting the battery and starting the engine, manually operate the throttle from the engine bay to ensure that the linkage and cable move freely without sticking or binding.
- Reconnect the Battery: Once everything is checked and double-checked, reconnect the battery.
- Engine Test: Start the engine and observe the behavior of the throttle and kickdown mechanisms. The engine should idle smoothly, and the throttle should return to its resting position when released.
- Test Drive: If possible, take the vehicle for a test drive to ensure that the transmission downshifts appropriately when the accelerator is pressed. Pay attention to the responsiveness and any unusual behaviors.
Troubleshooting
Adjustment Refinement:
- If issues are noted during the test drive, such as delayed downshifting or too-quick gear changes, additional adjustments may be required. Adjust the tension on the kickdown cable and check the throttle linkage again for any misalignment or sticking points.
Adjusting and Testing
Fine-Tuning Cable Tension: Adjust the kickdown cable to ensure it provides the correct pressure for shifting gears. The cable should have slight tension but should not be overly taut. Test the throttle response by manually operating the throttle in the engine bay to observe how the cables react.
Testing the Installation: Reconnect the battery and start the vehicle to test the new setup. It’s important to monitor the transmission’s behavior as you accelerate. Make sure the vehicle shifts down appropriately when expected. Listen for any unusual noises that could indicate improper installation.
Troubleshooting Common Issues
After installing a kickdown bracket on a Sechardy carburetor, the next critical steps involve precise adjustments and thorough testing to ensure optimal performance. These steps are vital for the smooth operation of your vehicle’s transmission, especially during quick acceleration. Here’s a detailed guide to adjusting and testing your new installation:
Step 1: Adjusting the Kickdown Cable
Fine-Tuning for Proper Tension:
- Locate the Adjustment Point: The kickdown cable will have an adjustment feature, usually a screw or a sliding mechanism, near the bracket attachment.
- Adjust for Correct Tension: The cable should be tight enough to trigger downshifting when the accelerator is pressed but not so tight that it’s constantly engaged. Adjust the tension by either tightening or loosening the adjustment feature. A good starting point is to ensure there is just a slight resistance when you pull on the cable by hand.
- Check for Smooth Operation: After adjusting, manually activate the throttle to ensure the kickdown mechanism engages smoothly without sticking.
Step 2: Manual Testing of the Throttle Response
Ensuring Free Movement:
- Operate the Throttle by Hand: With the vehicle still off, manually operate the throttle from the engine bay. Watch how the throttle and kickdown cables move. They should return to their idle positions smoothly when released.
- Look for Any Binding: If the throttle or kickdown cable sticks, binds, or does not return smoothly, additional adjustments may be necessary. This might involve re-aligning the bracket, re-routing the cables, or further adjusting the tension.
Step 3: Reconnecting the Battery and Starting the Engine
Power Up and Initial Checks:
- Reconnect the Battery: Once all mechanical adjustments are completed, reconnect the negative battery terminal.
- Start the Engine: Turn on the engine and let it idle. Observe the immediate response of the engine and listen for any unusual noises. A smooth idle without fluctuation indicates a good initial setup.
Step 4: Test Drive
Evaluating Performance Under Real Conditions:
- Safe Testing Environment: Choose a safe and legal environment for a test drive, such as a low-traffic road or an industrial area.
- Accelerate to Test Downshifting: During the test drive, accelerate as you normally would. Pay attention to how the vehicle downshifts. The downshift should occur smoothly and at appropriate times based on your acceleration.
- Vary Speeds and Loads: Try different speeds and use uphill routes if possible. This variation tests the kickdown mechanism under various load conditions.
Step 5: Fine-Tuning Adjustments
Refinement for Perfect Operation:
- Monitor Transmission Behavior: If the transmission shifts too early or too late, further adjustments to the kickdown cable may be necessary. This is often a process of trial and error to find the optimal setting.
- Repeat Testing if Needed: After each adjustment, repeat the manual and driving tests to check the results of your changes.
Troubleshooting Common Issues
Identifying and Correcting Installation Issues:
- Delayed Shifting: If the vehicle shifts gears later than expected, tighten the kickdown cable slightly.
- Early Shifting: If the vehicle shifts prematurely, loosen the kickdown cable.
- Sticking or Binding: Check the entire length of the throttle and kickdown cables for any obstructions or sharp bends that might be causing friction.
Read Also: Brk 1046836 or 1046835: An In-Depth Comparative Guide
Maintenance Tips
Regular maintenance of your kickdown bracket and associated components is essential to ensure ongoing reliability and performance of your vehicle’s transmission system. Here are some essential tips to help you maintain the kickdown bracket on a Sechardy carburetor, preventing common issues and extending the life of your vehicle’s transmission.
Regular Inspection
1. Check for Loose Connections:
- Frequency: Inspect the connections of the kickdown bracket and associated cables every few months or according to your vehicle’s maintenance schedule.
- What to Look For: Ensure all bolts and screws securing the bracket are tight. Check the kickdown and throttle cables for any slack or signs of wear.
2. Monitor Bracket and Cable Integrity:
- Visual Inspection: Regularly examine the bracket for any signs of corrosion, rust, or damage, which can occur due to exposure to elements or engine heat.
- Cable Condition: Look for fraying, kinks, or stiffness in the cables. These conditions can impair the smooth operation of the transmission system.
Cleaning and Lubrication
3. Keep the Area Clean:
- Cleaning Frequency: Clean the carburetor area and the kickdown bracket every oil change or service interval.
- Method: Use a suitable carburetor or engine cleaner to remove grime and oil buildup. Ensure the cleaner is compatible with your vehicle to avoid damaging components.
4. Lubricate Moving Parts:
- Lubrication Points: Apply lubricant to the throttle linkage and kickdown cable to ensure smooth operation.
- Type of Lubricant: Use a high-quality lubricant designed for high-temperature environments typically found in engine compartments.
Performance Checks
5. Test Throttle and Kickdown Functionality:
- Regular Testing: Every few months, test the functionality of the throttle and kickdown system. This can be done during a routine drive where you monitor the responsiveness of the vehicle when accelerating.
- Look for Changes: Pay attention to any changes in the transmission’s behavior, such as delays in downshifting or unusual revving, which might indicate an issue with the kickdown setup.
Professional Inspection
6. Annual Professional Checkup:
- Expert Evaluation: Even with regular personal maintenance, having a professional mechanic inspect the kickdown system can provide deeper insights, especially if you notice any ongoing issues.
- Comprehensive Review: A professional can check not just the kickdown bracket but also other elements of the transmission system that might be affected by or affect the bracket’s performance.
Addressing Issues Promptly
7. Respond to Issues Quickly:
- Importance of Timely Repairs: If you notice any irregularities during regular checks or driving, address them as soon as possible to avoid further complications or damage.
- Consult Documentation: Refer back to your vehicle’s service manual or installation guide for troubleshooting tips specific to your model.
Keeping Records
8. Maintain a Log:
- Service History: Keep a record of all maintenance performed on the kickdown bracket and associated systems. This not only helps in troubleshooting future issues but also adds value to your vehicle by documenting diligent care.
Conclusion
Installing a kickdown bracket on a Sechardy carburetor can significantly enhance your vehicle’s performance, especially during high-demand situations like acceleration and hill climbing. By following this detailed guide, you should feel confident in your ability to perform this upgrade, ensuring smoother shifts and better overall vehicle responsiveness.
(FAQs): How to Install a Kickdown Bracket on a Sechardy Carburetor
1. What is a kickdown bracket, and why do I need one on my Sechardy carburetor? A kickdown bracket is a mechanical link that connects your carburetor’s throttle linkage to the transmission, enabling the vehicle to automatically downshift during rapid acceleration. Installing one ensures smoother and more responsive driving, particularly when more power is needed quickly.
2. What tools will I need to install a kickdown bracket on a Sechardy carburetor? You will need:
- A set of screwdrivers (Phillips and flathead)
- Adjustable wrenches or a socket set
- Needle-nose pliers
- Carburetor cleaner
- A clean rag or cloth
- Optional: Thread locker to secure bolts and screws
3. How do I prepare my vehicle for installing a kickdown bracket? Start by ensuring your vehicle is on a flat, stable surface with the parking brake engaged. Disconnect the battery to prevent any electrical shorts or unintended starts when working. Finally, clear the area around the carburetor by removing any components that might obstruct access, such as the air cleaner assembly.
4. How do I access the carburetor to install the kickdown bracket? Remove the air cleaner assembly and any other components that give you clear access to the top of the carburetor where the bracket will be mounted. This might involve loosening screws or bolts that hold these components in place.
5. Can I install a kickdown bracket if there’s already one attached to the carburetor? Yes, if an old or non-functional bracket is present, you will need to remove it first. Unscrew the existing bracket, taking care to keep all parts organized, as you might need some of these for the new installation.
6. What are the steps to properly secure the new kickdown bracket? Position the new bracket over the mounting holes on the carburetor. Secure it using the provided screws or bolts, ensuring they are evenly tightened to prevent misalignment. Use a thread locker for extra security if desired.
7. How do I adjust the kickdown cable for optimal performance? After installing the bracket and connecting the cables, adjust the kickdown cable to ensure it is snug but not overly tight. This adjustment is crucial for ensuring that the transmission downshifts appropriately when required.
8. What should I check during the test drive after installing the kickdown bracket? During the test drive, focus on how the vehicle responds to acceleration. Ensure that it downshifts smoothly and promptly. Pay attention to any unusual noises or behaviors, which could indicate that further adjustments are needed.
9. What maintenance is required after installing a kickdown bracket? Regularly check the bracket and associated cables for any signs of looseness or wear. Keep the carburetor area clean, and occasionally lubricate the throttle linkage and kickdown cable to ensure smooth operation.
10. What should I do if I encounter problems after installation? If issues arise, such as delayed shifting or poor vehicle response, revisit the cable tension adjustments. If problems persist, consult a professional mechanic or refer to your vehicle’s service manual for further troubleshooting guidance.